If video editing is slowing down your content engine, this playbook shows you how to remove the repetitive work without sacrificing quality. The goal is not to replace creativity. The goal is to automate the admin, the cleanup, and the production bottlenecks so you can publish more without adding headcount.
This guide is built from your video on automated video editing and turns the core lesson into a simple execution plan for founders, creators, and operators who want faster content output with fewer moving parts.
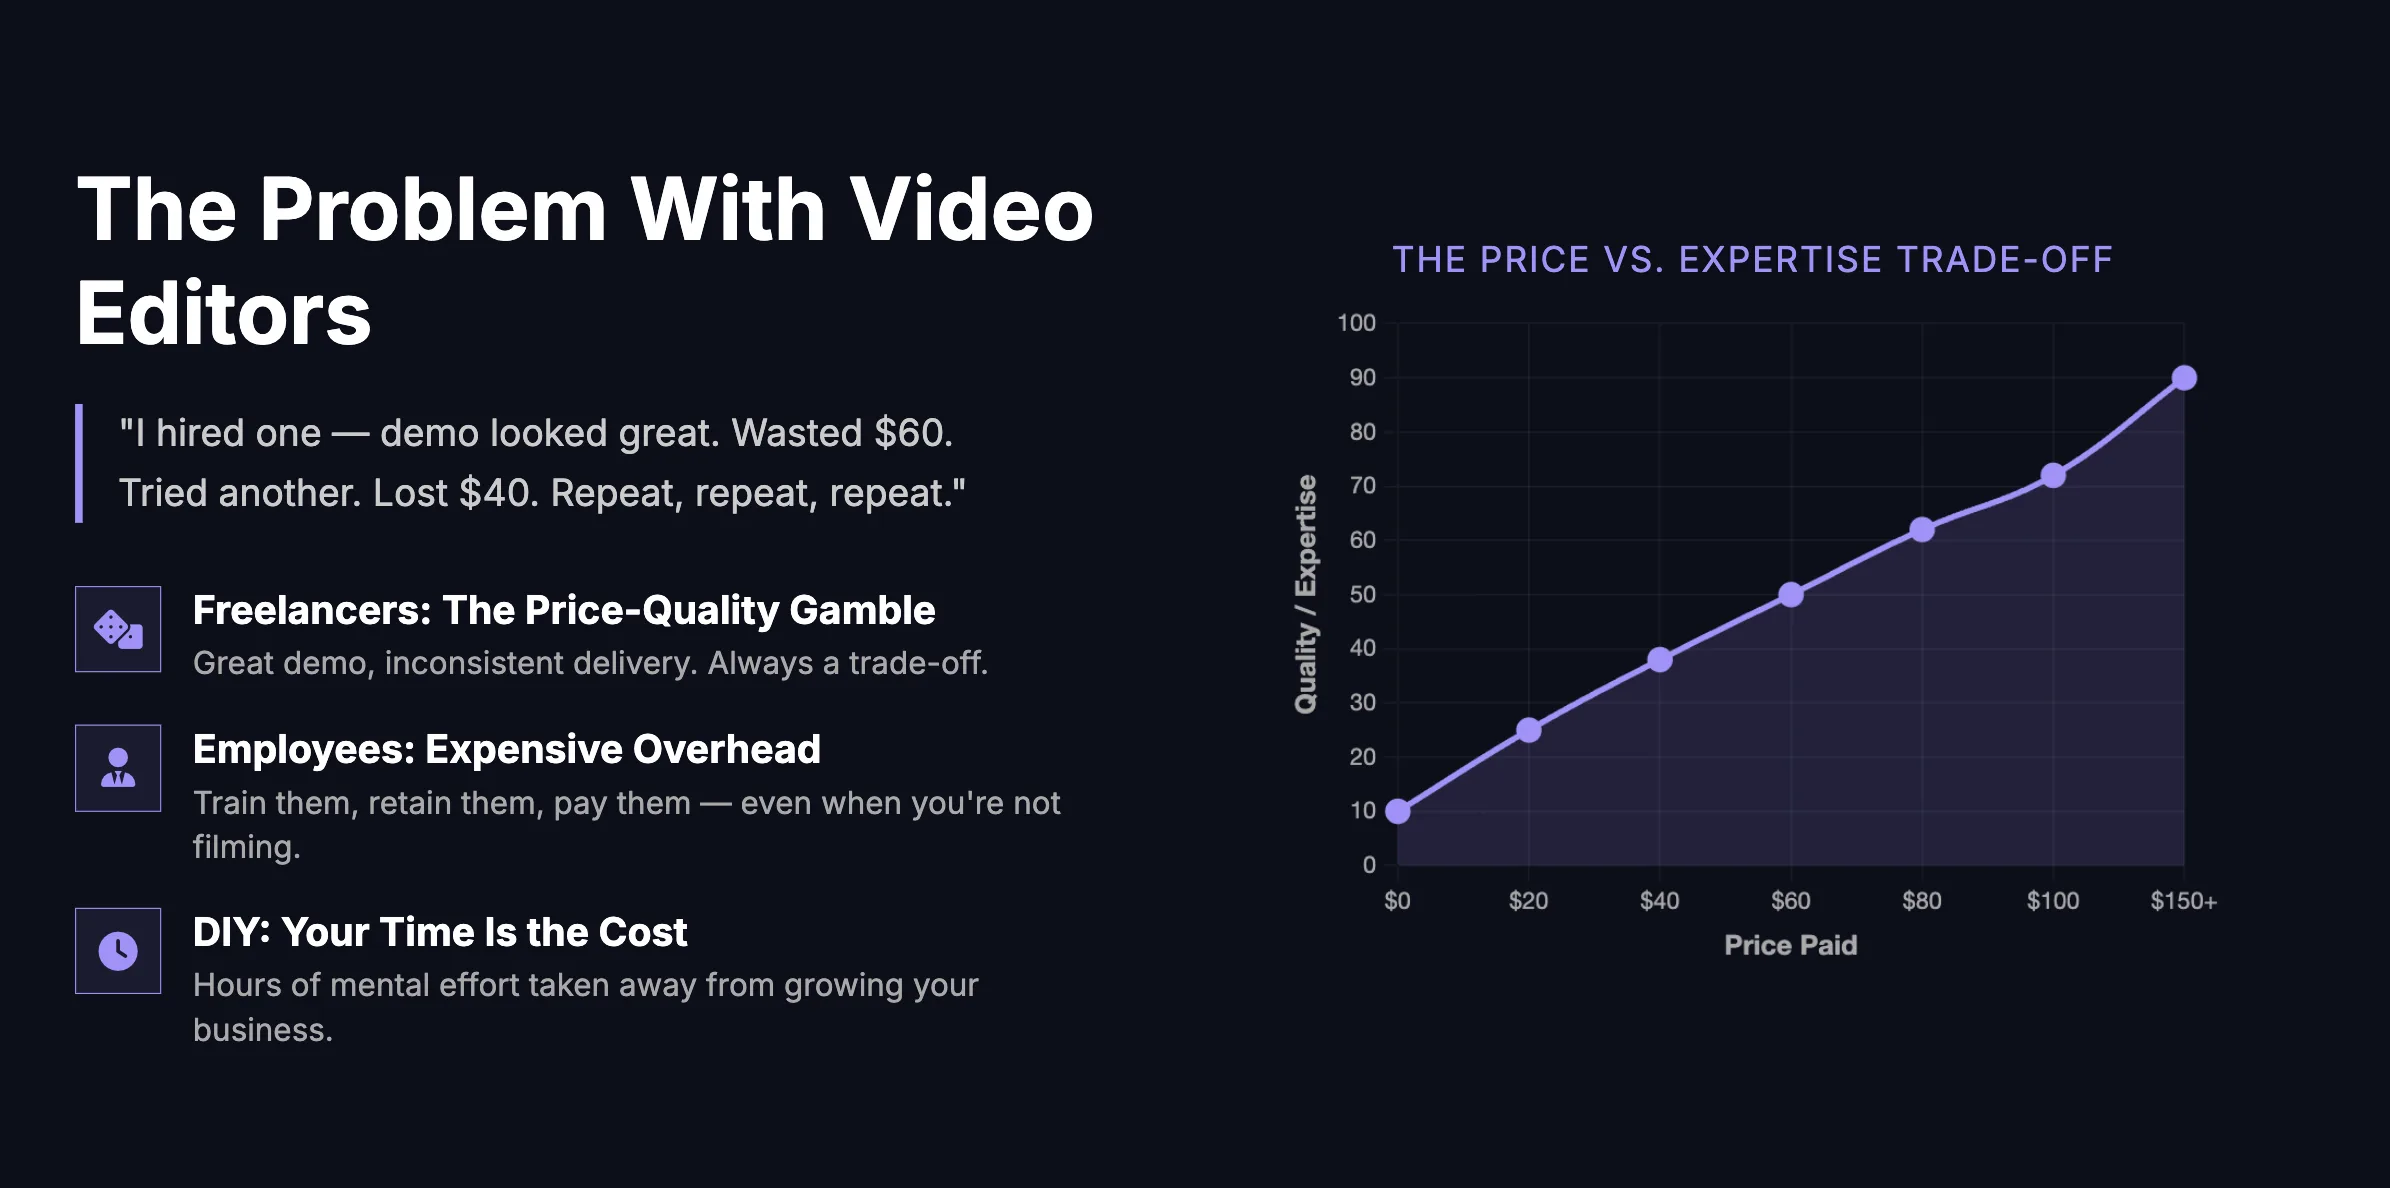
The Core Problem
Most businesses trying to scale video content usually fall into one of three traps. They either do everything themselves and lose hours every week, they hire freelancers and get inconsistent quality, or they bring editing in-house and take on overhead they do not actually want.
The better option is to automate the repetitive parts of editing first. That includes syncing footage, cutting silence, removing filler words, generating captions, adding B-roll suggestions, and producing motion graphics that stay on brand.
What Should Be Automated First
The best automations are usually the ones that pass the 4 Pillars Test. They are repetitive, they waste time, they create avoidable errors, and they produce clear ROI when scaled.
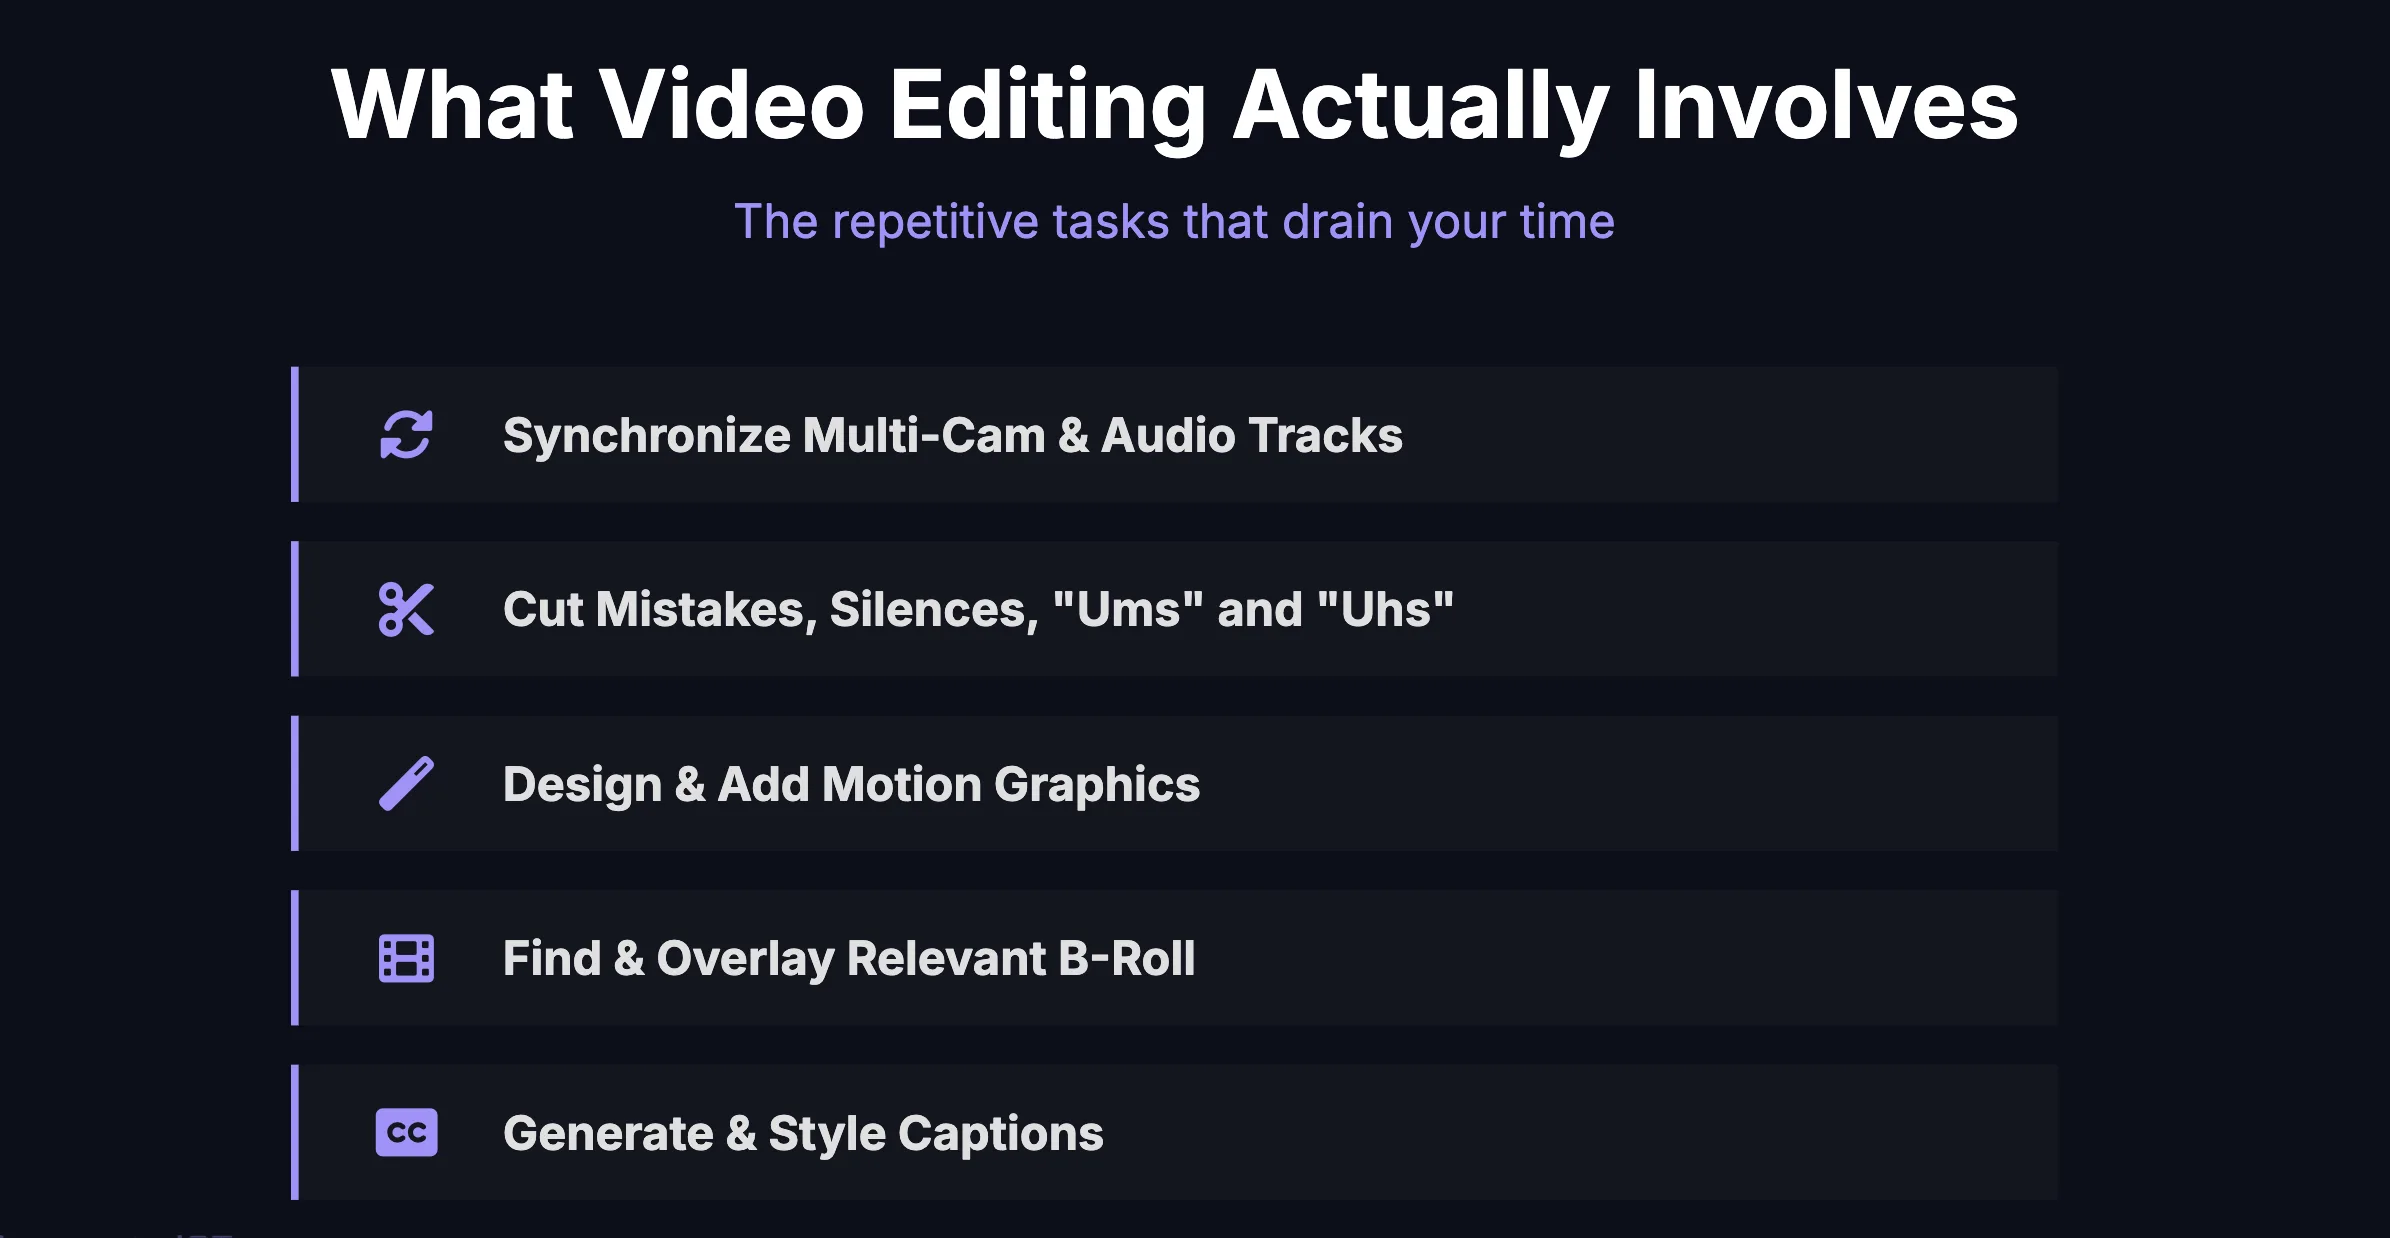
- Syncing footage and audio so you do not waste time lining up clips manually.
- Removing mistakes and dead space so rough cuts are produced automatically.
- Caption generation and styling so every video ships with consistent subtitles.
- B-roll prompts and suggestions so visual support is mapped to the right moments.
- Motion graphics and pop-ups so your brand visuals can be generated from a repeatable system.
- Final export workflow so publishing becomes predictable instead of manual.
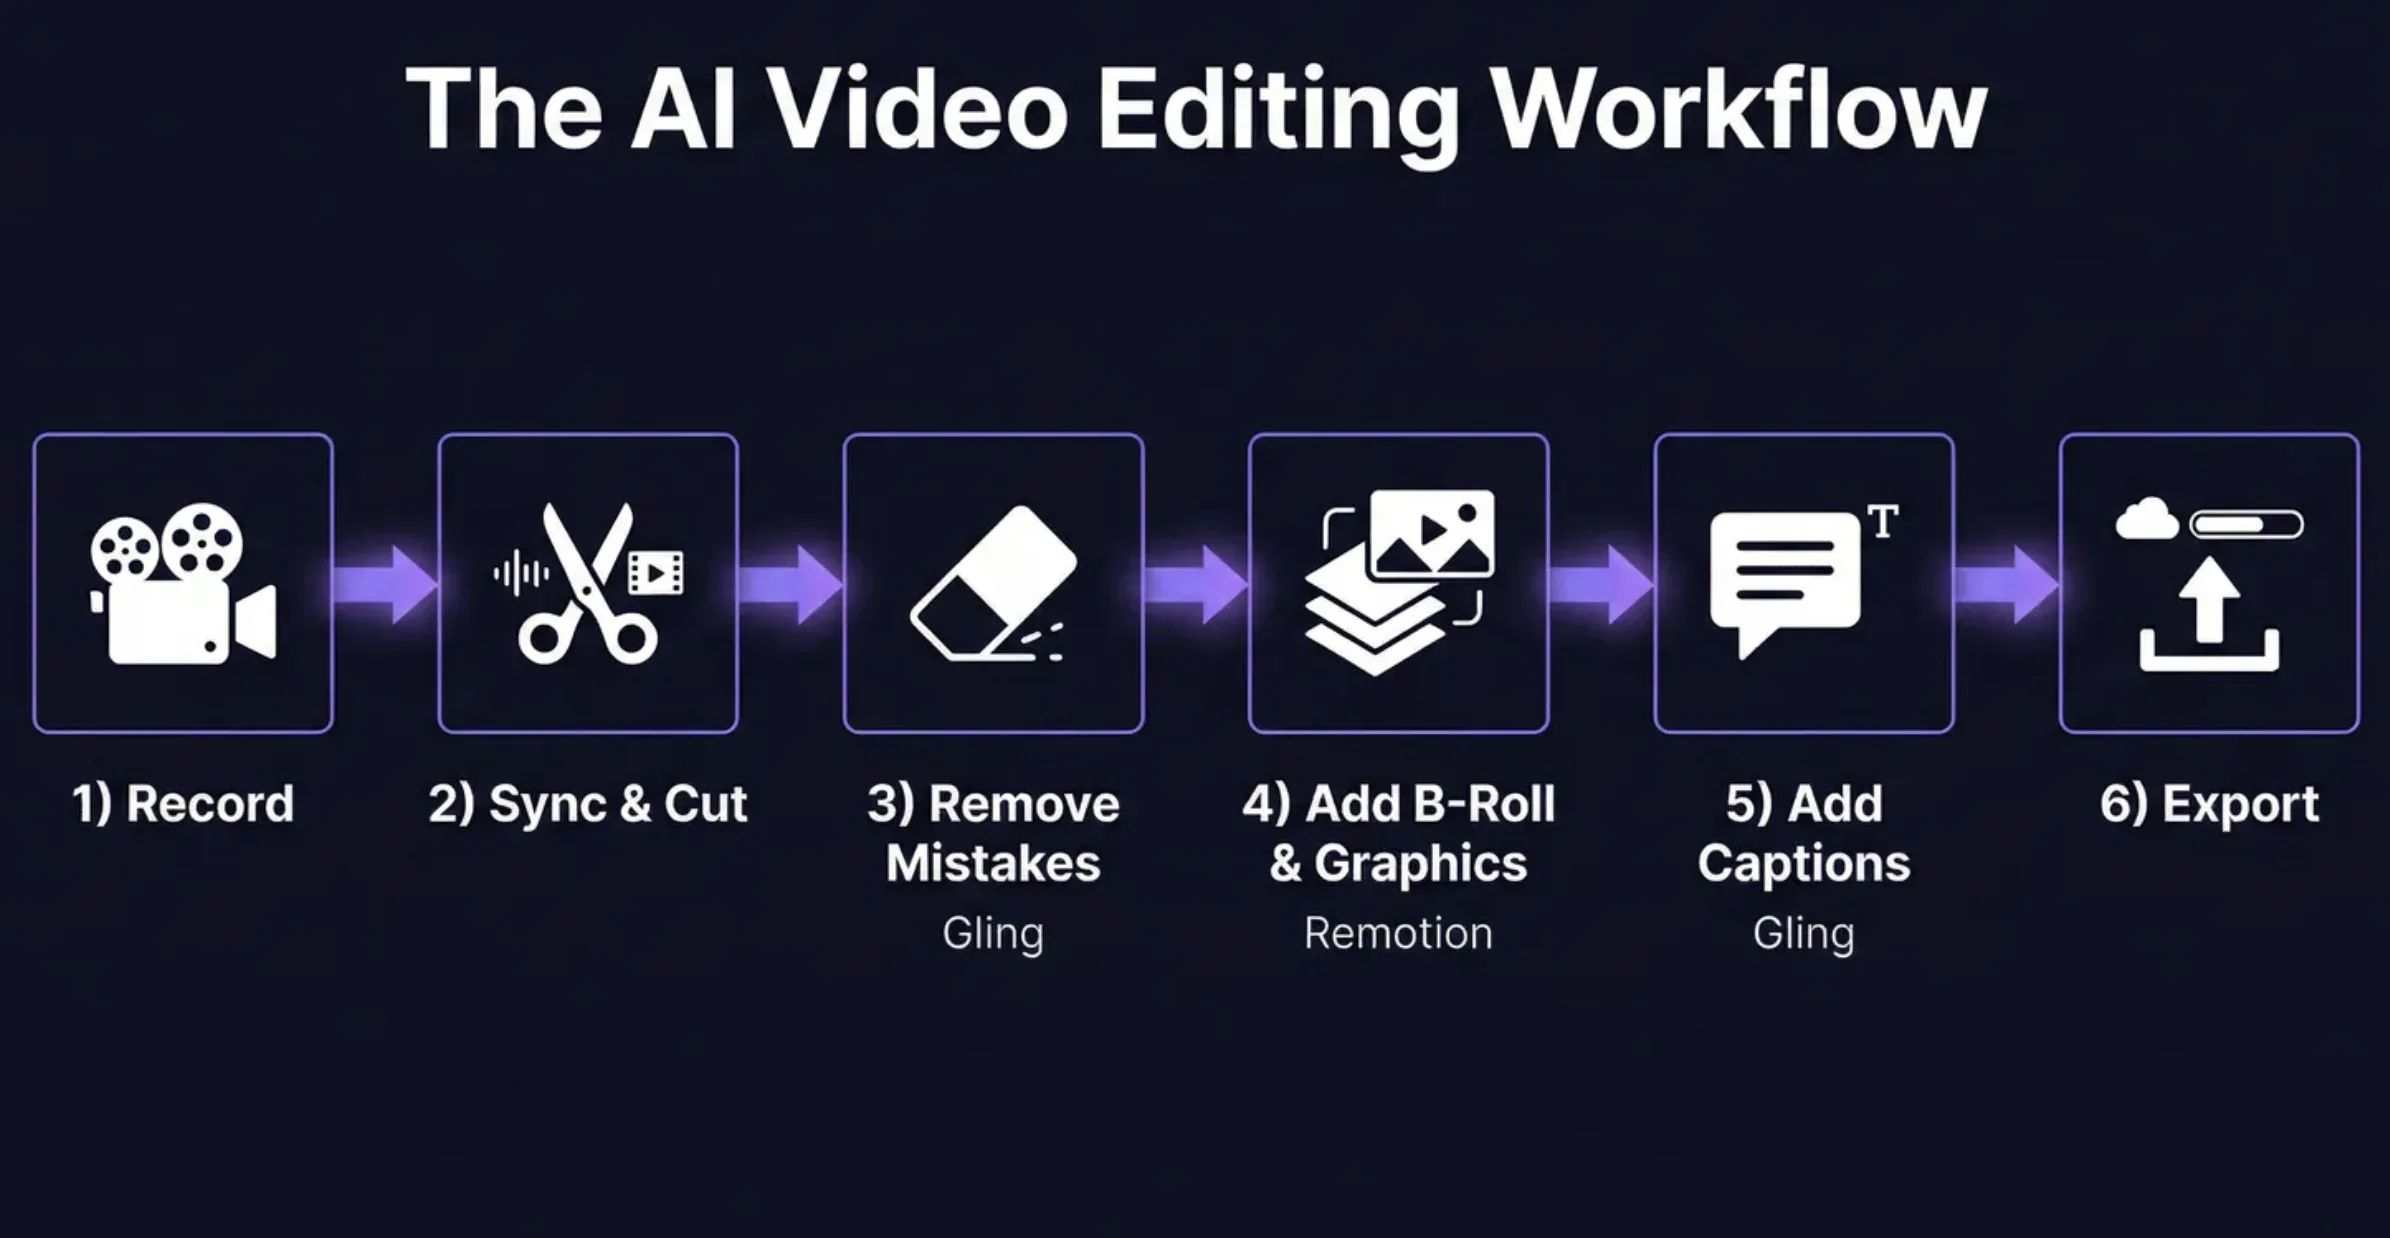
The 6-Step Automated Video Editing Workflow
1. Record Clean Source Material
Start with your main talking-head footage and the best audio you can capture. AI works far better when your raw inputs are clean. You do not need perfection, but you do need usable source material.
2. Sync and Build the Rough Cut
Use AI-assisted editing tools to automatically sync tracks and assemble the first pass. This removes the most boring part of the workflow and gives you something usable much faster.
3. Remove Filler Words, Pauses, and Mistakes
This is one of the highest-ROI automations in the whole process. Instead of manually searching for every pause, restart, or awkward gap, let the system detect and trim them for you.
4. Add B-Roll and Visual Support
Once the rough cut is clean, layer in B-roll, cutaways, supporting visuals, and context cards. This can be partially automated by mapping transcript moments to visual prompts.
5. Add Brand-Styled Captions and Graphics
Captions should not be treated as an afterthought. They are part of the visual system of the video. If your captions and motion graphics match your brand, your content looks more expensive and more intentional.
6. Export and Publish
Once the workflow is defined, exporting becomes the last step of a production system instead of a messy handoff between people.
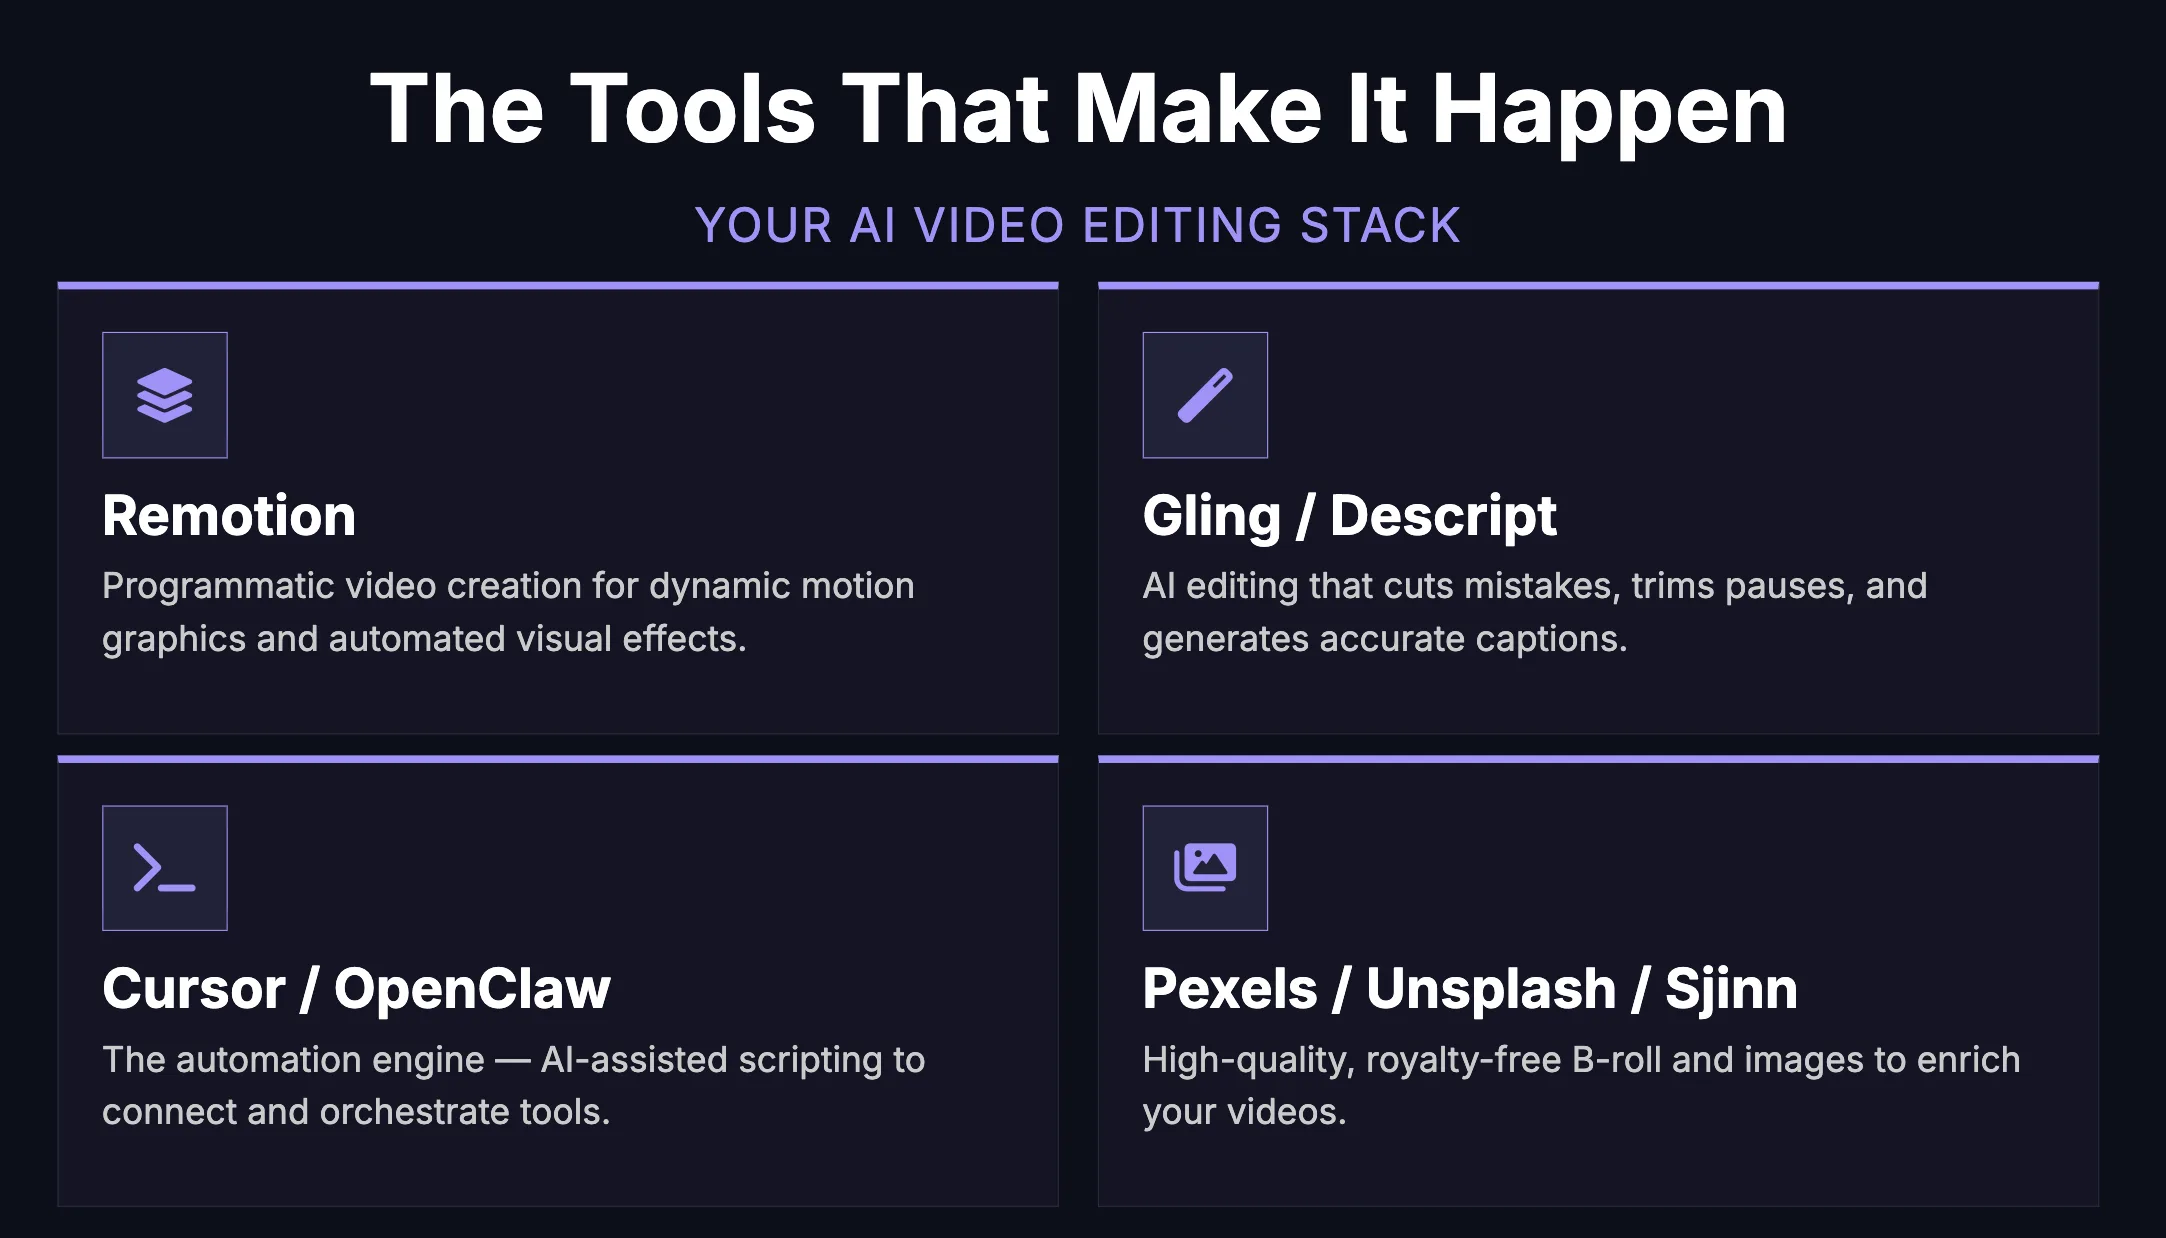
Suggested Tool Stack
The Real Lever: Turn Your Brand Into a Reusable Skill
One of the smartest ideas in this workflow is to stop prompting from scratch every time you need graphics. Instead, define your brand once and reuse it.
Your brand skill should include your preferred colors, fonts, motion style, caption style, lower thirds, spacing rules, and the kind of visual tone you want across videos. Once that is documented, the system can reuse it every time a new video is processed.
If you make the AI relearn your brand on every project, you stay stuck in manual mode. If you turn your brand into a reusable skill, you create leverage.
What to Put in Your Brand Skill SOP
- Your brand colors and hex codes.
- Your font choices and hierarchy.
- Caption style rules.
- Lower third and pop-up card layouts.
- Animation preferences.
- Logo placement rules.
- Approved B-roll style references.
- Examples of what good output looks like.
Quick Start Plan
If you want to implement this without overcomplicating it, follow this sequence.
- Run your next raw video through Gling or Descript.
- Measure how much time you save on the rough cut alone.
- Document your brand rules in one simple SOP.
- Use that SOP to standardize captions and graphics.
- Add automated B-roll suggestions based on the transcript.
- Only hire people after the workflow is defined and stable.
The Outcome You Want
The goal is simple. You want a content machine where the founder or creator focuses on ideas, delivery, and strategy while the repetitive production work is handled by systems.
That is how you increase output without increasing chaos. It is also how you avoid hiring too early for a problem that should have been solved with automation first.
Action Checklist
Final Takeaway
Do not try to automate taste. Automate repetition.
The winning workflow is the one where AI handles the cleanup, structure, and assistive production tasks, while you keep control of the message, the story, and the final creative decisions.